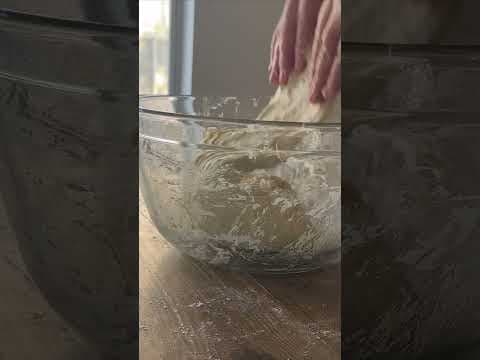
Stretch and Folds: Building Strength Without the Knead
Feeling like you're wrestling your sourdough dough? Forget the kneading! Learn the gentle power of stretch and folds to develop gluten strength and a beautiful loaf. Let's get to it, cobbers.

Right then, let's talk about something that'll change your sourdough game: stretch and folds. You’ve probably heard the term, maybe seen a few videos, but felt a bit unsure about what it's all about. It’s a core technique for building that lovely gluten structure we all chase, and the beauty of it is, you don't need to get in a wrestling match with your dough. No vigorous kneading required – just patience and a bit of understanding.
Many of us, especially when starting out, fall into the trap of thinking more kneading equals better bread. But sourdough is a different beast entirely. We’re relying on wild yeasts and a living starter, and those little fellas prefer a gentler approach. Stretch and folds are how we develop that gluten strength without beating the life out of your dough.
So, what's happening during a stretch and fold? Essentially, you're gently stretching the dough and folding it back onto itself. This action aligns the gluten strands, creating a network that traps the gases produced by your starter. Over time, with repeated stretch and folds, that network becomes stronger and more resilient. Think of it like reinforcing a building – you’re adding layers of strength without tearing it down.
The How-To: A Step-by-Step
- Timing is Key: The video mentions starting your stretch and folds 20-30 minutes after mixing. This is a good guideline, but pay attention to your dough. It needs to have developed *some* elasticity before you start.
- The Stretch: Gently lift a portion of the dough from one side of the bowl. Don't be aggressive – think about lifting, not pulling.
- The Fold: Fold that lifted portion over onto the rest of the dough.
- The Rotation: Rotate the bowl 90 degrees and repeat the stretch and fold. Do this four times, rotating the bowl each time, so you’ve stretched and folded from all four sides.
- Rest and Repeat: Cover the bowl and let the dough rest for another 20-30 minutes. Then, repeat the stretch and fold process.
The video rightly points out that as you perform these folds, you’ll notice the dough becoming more resistant. That’s a *good* thing! It means your gluten is developing. It's working against you because it's getting stronger. Don’t panic – that's exactly what we want.
Why Does This Work?
It’s not magic, it’s science. The stretching action aligns the gluten proteins, and the folding creates layers. Each fold redistributes the fermentation gases, ensuring even development. And that rest period? It allows the gluten to relax and strengthen, preventing it from becoming overworked.
Bread Angels like Lauren's Loaves are masters of this technique – keep an eye on HolySourdough for their workshops and insights. And if you're really keen to level up, a Guild Master can provide personalized guidance. They’ll be able to spot subtle things in your technique and offer tailored advice.
Don’t expect instant miracles. It takes practice to get a feel for the right amount of stretch and the proper timing. But with a little patience and observation, you’ll be amazed at the difference stretch and folds can make to your sourdough loaves. You’ll develop a better understanding of your dough, and that’s the key to baking consistently excellent bread.
Frequently Asked Questions
Loading comments...
Related Posts
Level Up Your Loaf: Understanding Dough Strength with Seba Bread

Stretch and Folds: It Ain't About Bragging, It's About Bread


Beyond the Swirl: What Cinnamon Rolls Teach Us About Dough Science
